Year - Model
2024 - EXV42024 - EXV2
2023 - EXV4
2023 - EXV2
Manufacture Dates
Between 04/20/2023 Thru 06/20/2024
Technical Service Bulletin
Summary:
The main battery disconnect switch used in the time frame noted above we have seen where a small piece of plastic can break off internally. This small piece of plastic can fall down into the contacts. As a result, the disconnect may not make any or full connection. This will result in the vehicle not power up or the disconnect switch getting hot.
Preventative Measure:
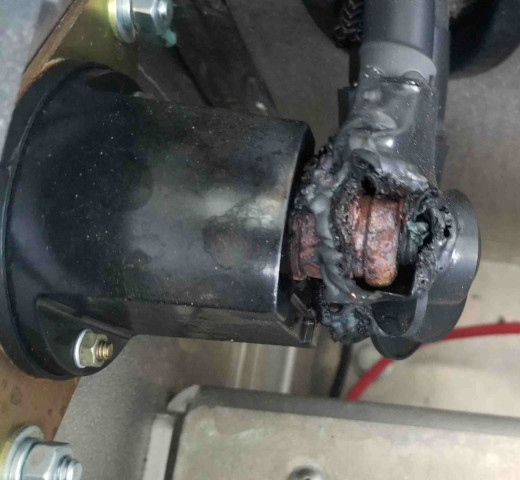
Take a look at the back side of the disconnect switch. If you see any signs of heat such as the rubber battery cable boots being melted or the cable and post being heavily rusted, then you will want to replace the disconnect switch. It is part# U5801A-N. This is a direct replacement. To access the back of the disconnect switch, open front hood and pull up on center tunnel cover which is just velcroed down. If equipped with air conditioner you will not have this cover. The disconnect switch is mounted to the passenger's side of the tunnel. It has two large battery cables running to it. Here is an image of what a bad disconnect switch might look like.
Installation Instructions for U5801A-N
1 - Turn main battery disconnect switch off in the passenger's side front wheel well. When turned off take and remove the lever from the disconnect.
2 - Make sure vehicle is not plugged in charging at the front bumper charge inlet.
3 - Take and remove the top battery cable from the disconnect switch. Typically requires a 17MM. This battery cable is connected to the negative side of the main battery pack. Try not to contact the other cable while removing this one. After having the cable removed cover the end of the cable so no metal is exposed. This will help keep it from contacting other components.
4 - Remove the bottom battery cable from the disconnect switch. This post will also have a smaller white wire. And in some cases, have a medium sized black wire. Remove these as well.
5 - Remove the two 1/4" bolts that hold the disconnect switch to the battery tunnel. Then disconnect will be loose and can be removed and discarded.
6 - Install the new disconnect switch using same hardware mounting the old disconnect switch. Also making sure to secure the lever chain to onto the rear mounting bolt as well.
7 - If cable boot needed to be replaced install new boot to lower cables and attached them to the lower disconnect post. Making sure to install all the cables back to the same post.
8 - If cable boot needed to be replaced install new boot to upper cable and attached it to the upper disconnect post. The upper post will always just have the single battery cable. No other wires or cables.
9 - Turn main battery disconnect switch back on. If equipped with lithium batteries vehicle will need to be plugged in to charge for at least 3 seconds before vehicle will turn on.