Battery Type/'s
-Flooded Lead Acid BatteriesWhen testing batteries in the e-ride vehicle, it is important to test all batteries. Proper performance of the vehicle depends on all batteries being in good condition. Testing will determine if one (or more) of the batteries needs to be replaced.
Battery Discharge Test
A. The preferred testing procedure is to use the Lester Electrical 72 Volt Battery Discharge Unit (Model 25680). This instrument puts a known discharge load (75 Amps) on the battery pack until the battery pack reaches 63volts. A timer incorporated into the discharger measures the time needed to reach that voltage level. capacity and remaining life can be determined from the test results. This item can be purchased from e-ride Industries as part#U5622A. Using the discharger is an easier more accurate method but requires some upfront cost. If you have multiple vehicles we highly recommend you to purchase this 72-volt battery discharger. Perform the test as follows:
1. First refer to discharge unit operating instructions to fully understand the safety and operation of the unit.
2. Turn off the main battery disconnect.
3. Remove all access panels to the battery pack. (see section 2.2.1)
4. Hookup the negative cable clamp of the discharger to B- of the battery pack.
5. Hookup the positive cable clamp of the discharger to B+ of the battery pack.
6. Run discharger as described in the dischargers operating instructions.
7. When the discharger is running its test, randomly test each battery sequentially in the pack individually with a multi-meter and record the readings. voltage should fall between 8.0 – 7.0 volts. 8.0is fully charged. 7.0 is completely empty. This will help give you an under standing of how each individual battery is performing.
8. The discharger will draw constant amperage of 80 amps. It takes 90-120 charge cycles to achieve full battery capacity. A new seasoned battery pack operating at 80°F (26.7°C)should have 112 AH of capacity. At this load the discharger should run 1 hour24 minuets (84 mins).
9. If discharge times are low, as described in the discharger instructions run the test a second time right away. The discharger will operate for 3 more minuets which gives you enough time to get a final individual battery voltage reading. Compare individual battery voltages recorded.
The results of the test can sometimes lead to several different conclusions about the battery pack and require varied action. The following goes over the results and the conclusions to be drawn from them:
1. If discharge time was 80 minutes or longer the issue is usually not with the batteries.
2. If discharge times are low, compare individual battery voltages recorded. If any battery shows a 0.4 volt or greater variance, that battery is bad or nearing the end of its useful life and should be replaced. The voltage of a bad battery will drop more rapidly near the end of the discharge than that of a good battery.
3. If all batteries are within 0.30 volts of each other, but the discharge time is low, the batteries are approaching the end of their life and the whole set will have to be replaced.
4. Other variables that need to be considered in this test is the battery temperature and Cycle life. If battery temperature is below or above 80°F (26.7°C) the overall capacity will lower or increase but the battery voltage should still not vary 0.30 volts of each other. As for cycle life it takes 90-120charge cycles to fully season the battery pack. Cycle cycles below this can lower the capacity as much as 20%. In other words, a new battery pack performs to 80% its rated capacity.
B. If the Lester Battery Discharge Unit is not available, an alternate battery test can be done using a multimeter to perform a voltage test of each battery. The most inexpensive way to perform this test is to use the vehicle’s drive system as its load. Perform the test as follows:
1. Charge the batteries until the charger shuts off.
2. Remove all access panels to the battery pack. (see section 2.2.1)
3. Make sure you have no loose components in the vehicle that could fall into the battery tunnel.
4. It will help to have two people to perform this test. One person to drive the vehicle and the other person use the multimeter to measure and record the voltage.
5. Itis best to pick a course that is flat and long without many stops.
6. Record what time the test started.
7. Check the battery pack voltage every 10 minutes of driving. As soon as the battery pack voltage reaches64 volts start measuring and recording each battery to the nearest 0.01 volt until battery pack reaches 63 volts which is zero state of charge. At this point, record the time and the test is complete.
The results of the test can sometimes lead to several different conclusions about the battery pack and require varied action. The following goes over the results and the conclusions to be drawn from them:
1. If discharge time was 80 minutes or longer the issue is usually not with the batteries.
2. If discharge times are low, compare individual battery voltages recorded in step 7above. If any battery shows a 0.4 volt or greater variance, that battery is bad or nearing the end of its useful life and should be replaced. The voltage of a bad battery will drop more rapidly near the end of the discharge than that of a good battery.
3. If all batteries are within 0.30 volts of each other, but the discharge time is low, the batteries are approaching the end of their life and the whole set will have to be replaced.
4. It takes 90-120 charge cycles to achieve full battery capacity. A new seasoned battery pack should have 112AH of capacity. On flat, even terrain as tock vehicle draws about 85 amps per hour at 25 MPH giving you 80 minutes of drive time. Totaling 33 miles per charge.
5. Othervariables that need to be considered in this test is the battery temperature, cycle life and amp draw. If battery temperature is below or above 80°F (26.7°C) the overall capacity will lower or increase but the battery voltage should still not vary 0.30 volts of each other. As for cycle life it takes 90-120 charge cycles to fully season the battery pack. Cycles below this can lower the capacity as much as 20%. In other words, a new battery pack performs to 80% its rated capacity. And as for amp draw this requires higher expensive equipment to be done accurately but what to consider here is if you are on a hilly terrain the vehicle will draw more lowing your overall run time.
Hydrometer Test
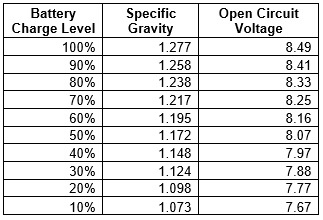
A third option for battery testing is to perform a specific gravity test of the battery electrolyte using a hydrometer. A hydrometer measures the specific gravity. An increase in the specific gravity correlates directly to an increase in battery state of charge. A fully charged battery should read between1.250 and 1.280 at 80°F. Never add acid to a battery to obtain a higher specific gravity.
Performing the hydrometer test
1. Be sure the batteries have sufficient water to cover the plates by approximately1/2” and are fully charged prior to beginning the test. If distilled water must be added, recharge the batteries before performing the hydrometer test.
2. Flip open the cover of the battery filling float assembly. Locate the white plug under the cover and remove it. These holes should provide enough access to be able to perform all tests.
3. Using a battery thermometer, record the electrolyte temperature of one of the middle cells.
4. Squeeze the rubber bulb of the hydrometer and insert it into the cell of the battery. Slowly release the bulb, drawing the electrolyte into the hydrometer. Fill and drain the hydro meter two to four times before drawing a sample.
5. When the hydrometer float rises off the bottom, adjust the electrolyte level so the float floats freely from the bottom but does not strike the top of the glass tube. Remove the hydrometer from the cell and release the pressure from the bulb.
6. Hold the hydrometer vertically, ensuring that the float is not contacting the sides of the barrel. Hold the hydrometer at eye level and read the scale at the level of the electrolyte.
7. Record the reading.
8. Return the electrolyte to the cell from which it was taken. Close float cap and replace the white plug.
9. Repeat steps 2-8 on all cells.
10. Temperature correct each cell reading. The readings obtained as described above must be corrected for temperature. Temperature correct each cell reading. For each 10°F (5.5°C) above 80°F (26.7°C) add 0.004 to the specific gravity reading. For each 10°F (5.5°C) below 80°F (26.7°C) subtract 0.004 from the specific gravity reading.
11. The specific gravity of all battery cells should be 1.277 + or - 0.007. If low cell readings exist (see chart below), charge battery and take specific gravity readings again.
12. If specificgravity of any cells remains low after complete charging, battery should be replaced.